Battle of Morristown AAR
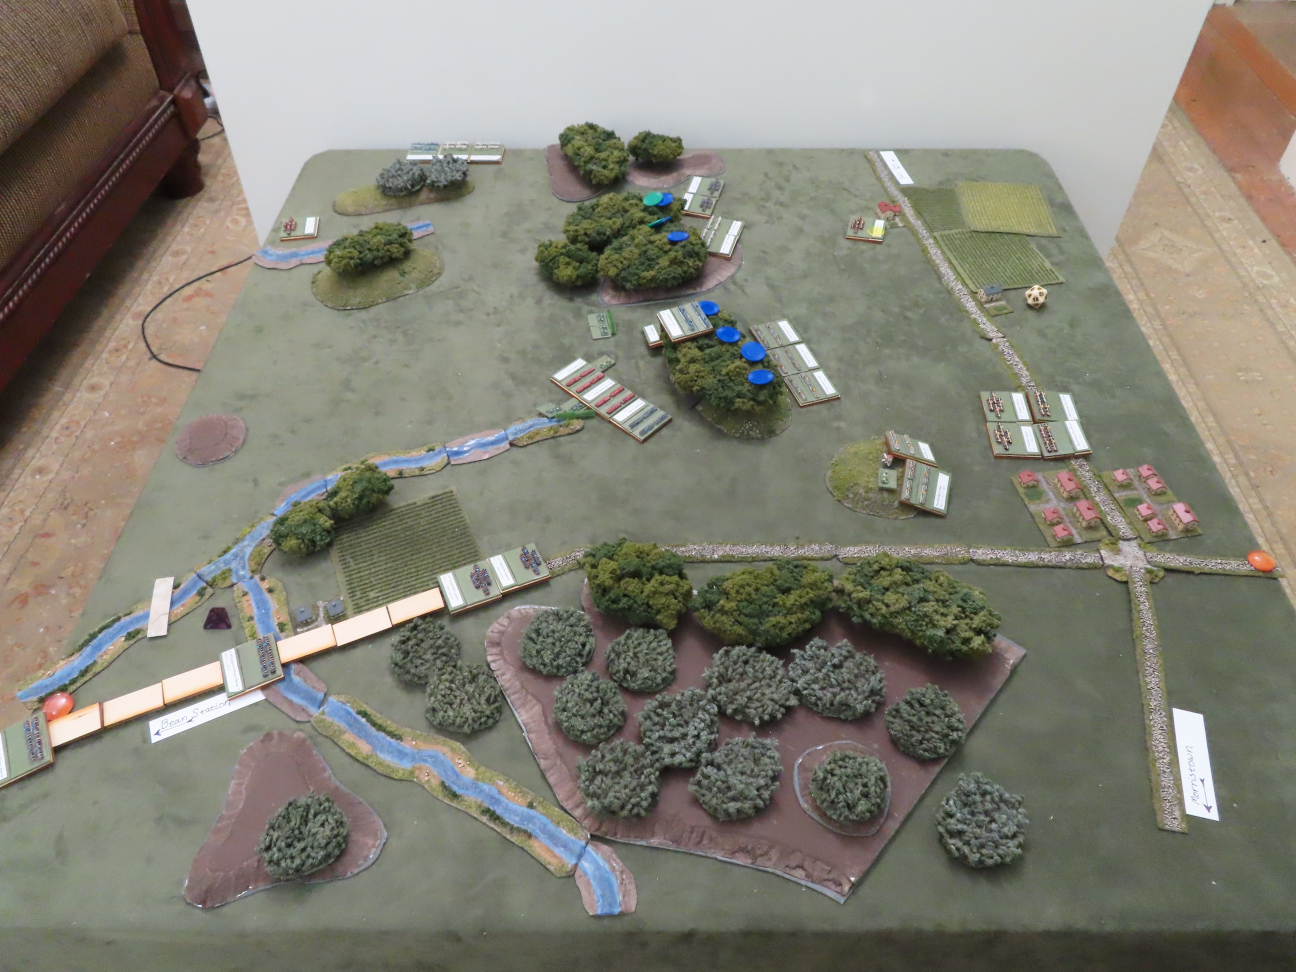
Last time we looked at the setup for this battle, which rules I was using, and the selection of a battlefield. Without further ado, it's time to see what happens. By way of reminder, here is the disposition of the troops at 10:00 am. Kingsville goes first.
 |
| Initial Deployment |
Turn 1 (10:00 to 10:30)
Both troops continue maneuvering into position. I don't have skirmish stands (either infantry or cavalry) painted up yet, so I'm using the blue poker chips to represent skirmish detachments (you'll see the original unit stands off to the top left side of the table). Here the Greeneville Rifles have begun sending detachments to take the wooded hill, and the Rogersville Light Dragoons have broken down completely into skirmishers to pass through the woods unimpeded. The Knoxville commander, accompanied by the White Pine and Dandridge line regiments surveys the battlefield from the top of a windmill on a hilltop.
 |
| End of turn 1 |
Turn 2 (10:30 to 11:00)
The cavalry charge by the 1st Jonesville Lancers on the east flank has gone well for them, as they have already eliminated half the Kodak 1st Lancers, and sent the rest back in Disorder (marked by the yellow tiddlywink). The light cavalry detachments also dismount (denoted by the green poker chips) and take a few ineffective shots. The artillery stays where it is, gaining the stationary status (green pipe cleaner). Meanwhile, in the center, the Greeneville Rifles (supported by the 1st Kingsport Line) have finished deploying along the edge of the woods, and execute an unbelievably deadly volley against the three regiments of Morristown Line (each skirmish detachment rolls 1 die, and as sharpshooters, they hit on a 5 or 6. I rolled three 5's, and 6!). On Kingsport's right flank, the second brigade of cavalry begin to arrive, still in a march column. Bolstered by their presence, the heavy infantry regiments begin an assault around the edge of the hill.
 |
| End of Kingsport turn 2 |
With the arrival of the Kingsport Heavy Cavalry, the Knoxville general (these guys need names!) knows his window for action is limited. He decides to take a bold gamble. Despite the Morristown infantry taking heavy losses, he orders them to take the wooded hill. The only other alternative is to take potshots into the woods (likely to miss) or to pull back (which doesn't advance his goals). In order to support them, he personally leads the Dandridge Line into a melee with Hawkin's Line which is screening the advance of Kingsport's heavy infantry. (Note that in Volley and Bayonet, when a unit retreats through other units, it disorders them, and can potentially even cause them to rout; Knoxville is hoping to jam up the Kingsport lines). He will have to trust his cavalry reserve to counter the newly arrived cavalry. Not shown in the picture below, the light cavalry on Knoxville's east flank are out of command and since they have no staying power, they fall back in disorder in an attempt to regroup with what remains of the 1st Kodak Lancers who are resting and rallying.
The charge from Dandridge goes well, as Hawkins' Line takes casualties and is forced to retreat back through the two regiments of heavy foot, disordering them. On the other hand, the artillery inflicts heavy losses on White Pine. Meanwhile, the Greeneville Rifles see the oncoming assault from Morristown, and fall back in disorder. The charge from Morristown continues until it reaches the 1st Kingsport Line which also falls back, displacing the already-disordered Dollywood Exiles (note: I realized after the fact that this charge should not have been allowed per the rules. Even though charges do continue after skirmishers fall back, Morristown did not have LOS to Kingsport at the beginning of their turn, due to the woods, and so they should have stopped before making contact. Oh well!).
 |
| End of turn 2 |
At this point, the armies are in two very different states. The Knoxville lines are in relatively good order, but they have suffered heavy losses in order to get here, and are nearing the point of exhaustion. The Kingsport army, on the other hand, has not suffered as many losses, but their lines are in total disorder (that jumble of yellow). If Kingsport cannot get their act together, Knoxville still has a slim chance to capitalize on that chaos. However, it is Kingsport's turn next.
Turn 3 (11:00 - 11:30)
Fortunately for Kingsport, all of their disordered units happen to be within command radius -- a benefit of short interior lines -- making it much easier to sort them out. Sensing the exhaustion of the Knoxville troops, the Kingsport general takes his own gamble, leading the Bays Mountain Boys on a lone charge to counter Dandridge, leader vs. leader, while sending the rest of the brigade (Dollywood and Hawkins') behind the stream, where they will be out of the way of any potential retreat, but also out of command next turn. This charge is supported by some ineffective flanking fire from some nearby Greenville Rifles detachments. Dandridge fights admirably in the melee with the Bays Mountain Boys, giving as good as they get, but ultimately are forced back by the advance of the grenadiers.
Similarly, the 2nd Jonesville Lancers on the near (west) flank leave the command of their brigade to execute a charge against White Pine's exposed flank, supported by artillery. White Pine, however, must have successfully formed square in time, as they were able to repulse the lancer charge on their flank -- though not without taking some casualties from the artillery.
On the far (east) flank, the cavalry skirmishing continues, with half the Jefferson City Light Dragoons routing from the advancing lancers (combination of yellow and red tiddlywinks) and the remainder being enveloped by dismounted detachments of the Rogersville Light Dragoons and eliminated. Knoxville's lancers do manage to drive off half of Kingsport's lancers, but it is too little, too late.
 |
| Kingsport turn 3, before combat |
 |
| Kingsport turn 3, after combat |
By now, Knoxville has suffered enough casualties that two of their brigades have become too exhausted to continue (yellow gems), meaning they will no longer be able to initiate melee. Morristown's Brigade is also still on the verge of exhaustion. Their general, realizing that his last-ditch assault has failed, and receiving word of the imminent collapse of his right flank, realizes that there is nothing more to be gained here, and issues the order to begin an orderly withdrawal from the battlefield. I assume they would want to pull back to Morristown, but that is for the GM to determine.
 |
| End of turn 3 |
Turn 4 (11:30 to12:00)
Kingsport attempts to take some final parting shots at Knoxville but these are ineffective. If further pursuit were desired post-battle, the Light Dragoons would be able to remount and perhaps chase down Knoxville's routing cavalry brigade (Jeff. City Light Dragoons & 1st Kodak Lancers) though these have a considerable head start (I forgot to move them off the table in the image below).
 |
| End of game |
Losses
The rules specify that each lost strength point (SP) represents the loss of half the number of men it represents. For example, a loss of 1 SP from a 4 SP unit represents the loss of 1/8th of the men in that unit. As this is the first battle, all of our regiments are 750 men, so each lost SP is about 94 men. The rules make no distinction between dead or wounded.
Kingsport Losses (Raw)
- 1st Kingsport Line: 2 of 4 SP = 188 men (562 remaining)
- Bays Mountain Boys: 1 of 4 SP = 94 men (656 remaining)
- Hawkin's Line: 2 of 4 SP = 188 men (562 remaining)
- 1st Jonesville Lancers: 2 of 4 SP = 188 men (562 remaining)
- 2nd Jonesville Lancers: 2 of 4 SP = 188 men (562 remaining)
Knoxville Losses (Raw)
- 1st Morristown Line: 2 of 4 SP = 188 men (562 remaining)
- 2nd Morristown Line: 1 of 4 SP = 94 men (656 remaining)
- 3rd Morristown Line: 2 of 4 SP = 188 men (562 remaining)
- White Pine Line: 2 of 4 SP = 188 men (562 remaining)
- Dandridge Line: 1 of 4 SP = 94 men (656 remaining)
- Jefferson City Light Dragoons: 3 of 4 SP = 281 men (469 remaining)
- 1st Kodak Lancers: 3 of 4 SP = 281 men (469 remaining)
Since the above numbers are very granular, and do not take wounded into account, I took the liberty of multiplying each number above by (28+4d10)% twice, to get a wounded and killed figure that are each in the range of 32% to 68% of the listed number. This may have involved a spreadsheet. Here are those randomized figures (take them, leave them, or just use the randomized number remaining).
Kingsport Losses (Randomized)
- 1st Kingsport Line: 83 wounded, 94 dead, 573 remaining
- Bays Mountain Boys: 42 wounded, 45 dead, 663 remaining
- Hawkin's Line: 83 wounded, 96 dead, 571 remaining
- 1st Jonesville Lancers: 86 wounded, 100 dead, 564 remaining
- 2nd Jonesville Lancers: 77 wounded, 103 dead, 570 remaining
Knoxville Losses (Randomized)
- 1st Morristown Line: 90 wounded, 94 dead, 566 remaining
- 2nd Morristown Line: 49 wounded, 57 dead, 644 remaining
- 3rd Morristown Line: 81 wounded, 75 dead, 594 remaining
- White Pine Line: 107 wounded, 88 dead, 555 remaining
- Dandridge Line: 54 wounded, 44 dead, 652 remaining
- Jefferson City Light Dragoons: 146 wounded, 169 dead, 435 remaining
- 1st Kodak Lancers: 160 wounded, 138 dead, 452 remaining
Conclusion
There were three events in turn 2 that all went in Kingsport's favor and which all contributed to their ultimate success. First, their left flank cavalry had a successful charge; this was 50-50 odds, but Knoxville could never recover from this, and it led to their flank eventually collapsing. Second, the Greeneville Rifles were the MVP, with an absolutely devastating volley on the Morristown Line Regiments that stalled what could have been a dangerous assault from a defensive position. Third, the right flank cavalry showed up on turn 2 (instead of 3 or 4) which really put the pressure on Knoxville to act sooner rather than later. Knoxville's assault with the Dandridge Line was a valiant effort to turn the tables, but it failed to create enough casualties to do so.
Will Knoxville retreat back to the south, or head to Morristown? With Kingsport in control of the crossroads, they can establish a line of support back east to Bull's Gap and Rogersville. But where do they go next? Invest in a siege of Morristown? Go march elsewhere? Only time will tell.

Comments